Here is the honest frustration: you did everything right on the marinade, the rub, the cook time, and then the chicken just glued itself to the grate like it was welded there. You yanked it off and left half the skin behind. Sound familiar? The problem was not your technique. It was the grate you were cooking on. Burned carbon buildup, old grease, and oxidized residue turn a good grill grate into a trap. Cleaning it properly, before and after every cook, is the single maintenance step that pays the most dividends.
Most people either skip grate cleaning entirely or attack it with a gas station wire brush that sheds bristles into their food, which is a real safety hazard. The right approach is simpler than you think, takes about five minutes, and requires tools that are actually built for the job. I will walk you through the full method, step by step, so that food releases clean, flavors stay true, and your grates last as long as your grill does.
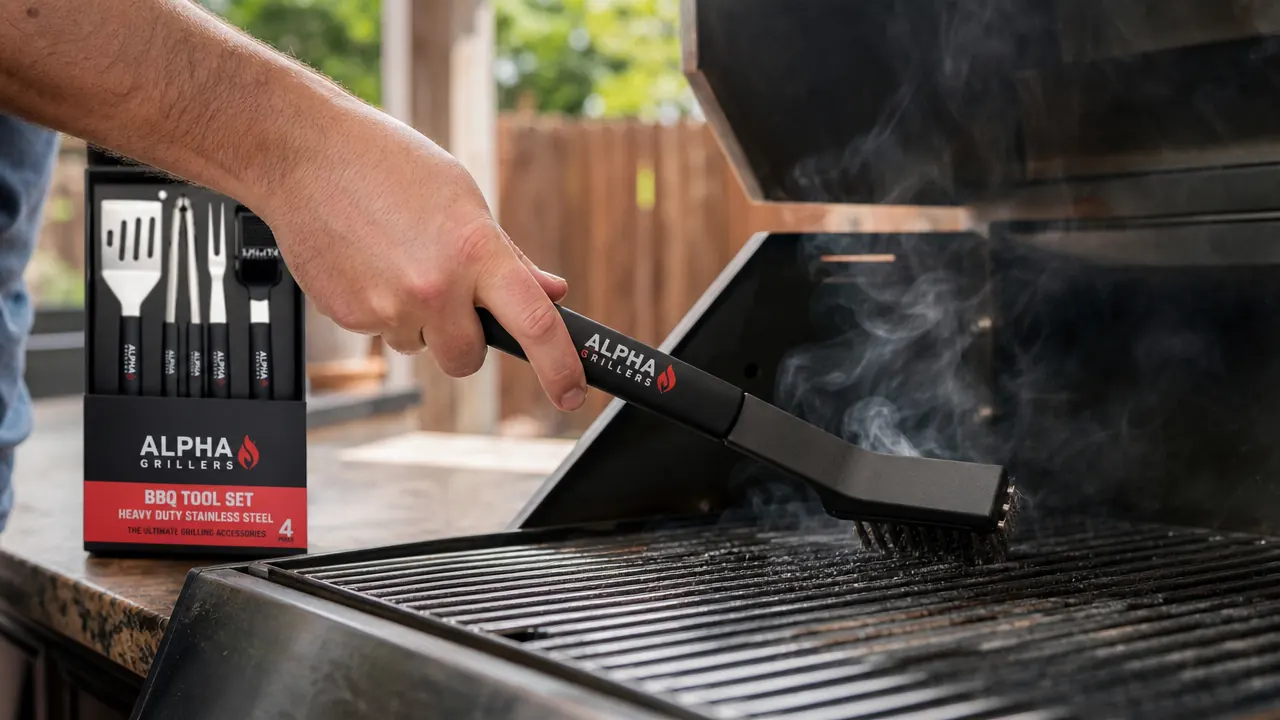
Still fighting stuck food? The Alpha Grillers tool set has the brush and scraper you need for this job.
The Alpha Grillers BBQ Grill Tool Set includes a heavy-duty spatula, long tongs, a solid fork, and a grill brush, all in stainless steel with heat-resistant handles. Rated 4.8 stars by nearly 6,000 backyard cooks. It is the set I reach for every time I open the lid.
Amazon Check Today's Price on Amazon →Why Grate Cleaning Actually Matters
Before we get into the steps, it is worth understanding what you are dealing with. Grill grates collect three things between cooks: carbonized food particles, polymerized grease, and oxidation. The first two cause sticking and off-flavors. The third weakens the metal over time, especially on cast iron and coated steel grates.
Carbonized food is the black, chalky crust that builds up in the corners and valleys of the grates. It does not add flavor. It transfers bitterness to your food and creates an uneven cooking surface. Old grease goes rancid and smokes excessively at high heat, which is where mystery flare-ups come from. Clean grates also make oil stick evenly when you apply it before a cook, which is what actually gives you those clean grill marks instead of torn, patchy char.
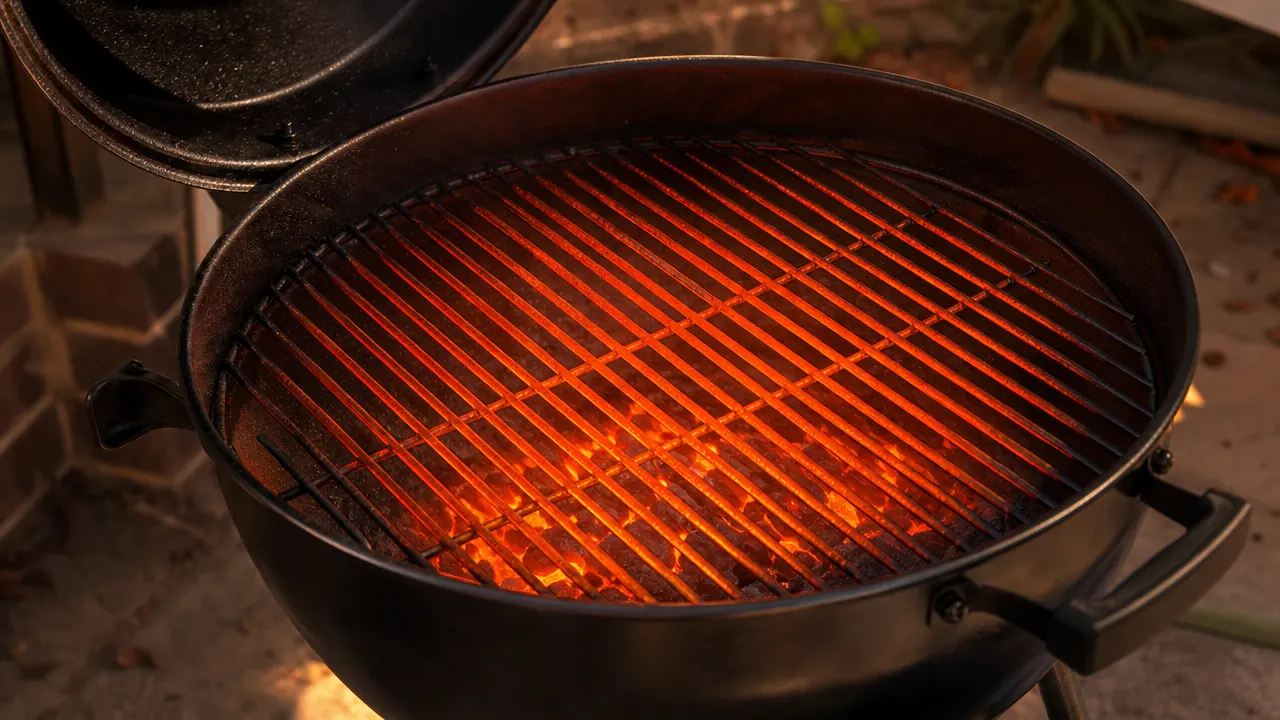
Step 1: Burn It Off While the Grill Is Still Hot
The easiest time to clean grill grates is right after you finish cooking, while the grate is still hot. Close the lid, crank the heat to high for about ten minutes, and let the residual food and grease incinerate. This is called a burn-off, and it does most of the heavy lifting for you. What was stuck food is now ash, and ash brushes off easily.
After the burn-off, open the lid and use a long-handled grill brush to scrub the grates. Work in firm, straight strokes along the grate bars, not across them. The Alpha Grillers brush in their BBQ tool set has a wide bristle head that covers two or three bars at once, which cuts the time in half compared to narrow brushes. Do the full surface front to back, flip if you can, and hit the back side of the bars too.
One note on wire brushes: inspect your brush before every use. If the bristles are starting to loosen or the head is warping, replace it. Loose metal bristles on food are a genuine hazard. The Alpha Grillers brush holds up well across a full season with normal use, but no brush lasts forever.
Step 2: Scrape the Bars Down to Bare Metal
The brush handles surface residue, but the real cleaning happens with the scraper. Once the burn-off is done and you have brushed off the ash, take a grill scraper or the back edge of a heavy spatula and run it firmly along each bar. You are looking to strip off any remaining polymerized grease that the brush left behind. This is usually a dark, almost lacquer-like coating on the bars, especially on a grill that has not been cleaned in a while.
The Alpha Grillers spatula is long enough (18 inches) that you can reach the back rows without leaning over the grill. The head is thick stamped stainless steel, which gives you enough rigidity to use some force without the blade bending. Cheap spatulas flex and skip over the buildup. This one does not. Work each bar from front to back, scraping toward you, and knock the debris into the drip tray below.
Step 3: Do a Cold Deep-Clean Every Four to Six Weeks
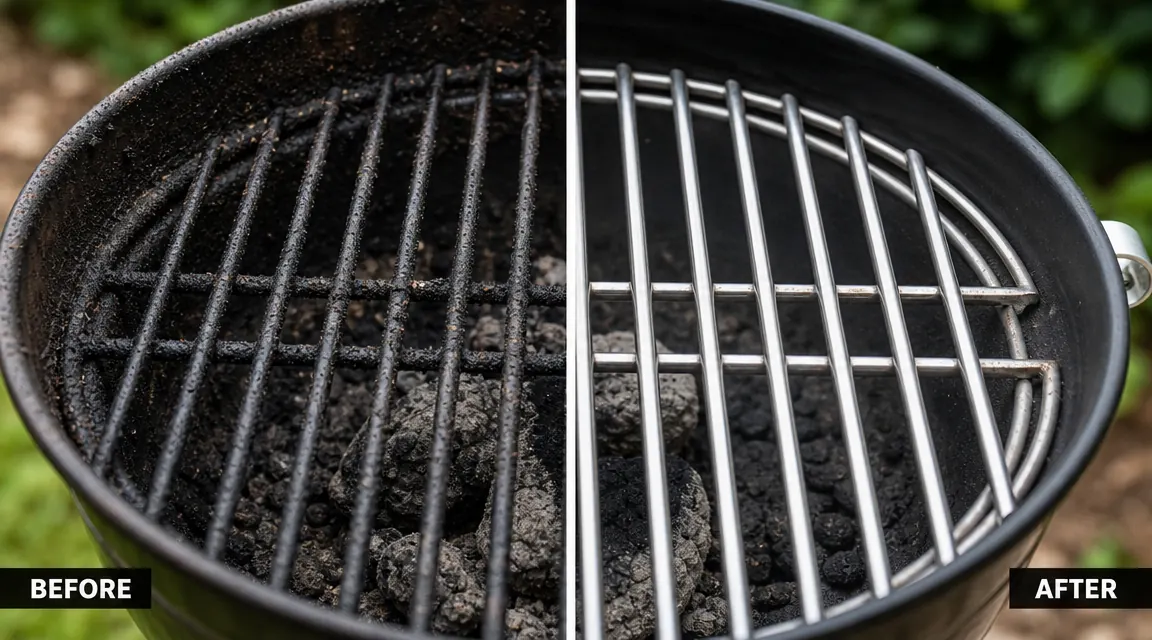
The hot-clean method handles everyday maintenance. But every month or so, when you can see that grease and residue are building up in the corners and the burn-off alone is not cutting it, pull the grates out and do a cold deep-clean. This is a 20-minute job and it makes a noticeable difference.
Remove the grates completely. Fill a large bucket or plastic tub with warm water and a squirt of dish soap. Let the grates soak for 15 to 20 minutes. The soak loosens what the heat and brush cannot, especially on cast iron grates with rough surfaces where grease hides. After the soak, scrub with a stiff-bristle brush or a wad of aluminum foil crumpled into a ball. Rinse thoroughly with the hose. Let them air dry or wipe them dry before reinstalling.
If you have cast iron grates, skip the dish soap because it strips the seasoning. Use warm water only and a coarse scrubber. Dry them immediately and apply a thin coat of vegetable oil with a folded paper towel before putting them back. Cast iron needs that protective layer or it rusts fast, especially in humid climates.
Step 4: Re-Season the Grates Before the Next Cook
This is the step most backyard cooks skip, and it is the one that actually prevents sticking. Before you put any food on the grill, heat the grates to medium-high, fold a paper towel into a small pad, dip it in vegetable oil or canola oil, and use your tongs to wipe the hot grates in long strokes. You want a thin, even coat. Not a pool of oil. Too much oil causes flare-ups and a greasy, smoky mess. A thin coat is all you need.
The tongs in the Alpha Grillers set have a 17-inch reach and a locking mechanism that keeps them closed for storage. For oiling the grates, the extra length matters because you are working over high heat and a short handle puts your wrist too close to the grates. Grip the paper towel pad at the very end of the tong tips and move confidently. Two or three full passes front to back is plenty.
A thin coat of oil on hot grates before every cook is the difference between food that releases clean and food that tears. You are not greasing a pan. You are building a temporary nonstick surface.
Step 5: Build a Post-Cook Habit That Sticks
The best grate cleaning plan is the one you actually do consistently. Here is the simplest version: when you pull the last piece of food off the grill, close the lid and turn the heat to high. Walk inside, plate your food, pour yourself a drink. Come back in eight to ten minutes. Open the lid. Brush the grates with your grill brush. Turn the heat off. Done. That is it. The whole thing takes four minutes of active effort and it keeps your grates in good shape almost indefinitely.
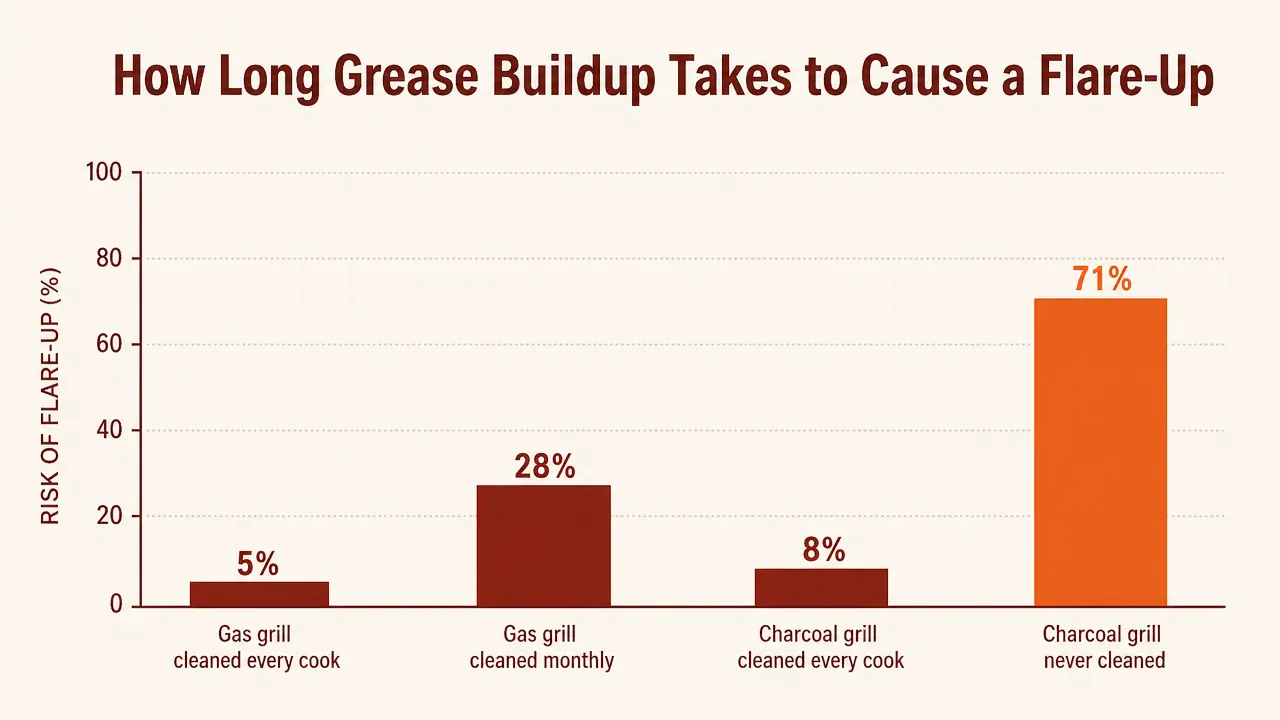
If you skip it one time, the buildup is not catastrophic. Skip it three cooks in a row and you are dealing with a deep-clean situation that takes real effort. The habit protects you from the bigger job. If your tools are right there, hanging on the grill or in a caddy nearby, you are far more likely to actually do it. That is one of the underrated reasons a good tool set matters. When the brush and spatula are flimsy and annoying to use, the maintenance step gets skipped. When the tools are solid and feel good in your hand, you do it without thinking.
What Else Helps Keep Grates in Good Shape
Beyond the cleaning steps, a few habits extend the life of your grates considerably. First, always preheat with the lid closed for at least ten minutes before cooking. This brings the whole cooking surface up to temperature evenly and helps burn off any moisture that collected since the last cook. Cold or damp grates are one of the leading causes of sticking, even on a well-seasoned surface. Second, avoid metal spatulas with thin edges on porcelain-coated grates, which scratch the coating and expose bare steel to rust. The Alpha Grillers spatula has a rolled edge that is firm but not razor-sharp, which works well on porcelain without gouging.
Third, let food tell you when it is ready to flip. This sounds obvious but it is worth saying: if your burger or chicken thigh is sticking when you try to flip it, it is probably not ready. Food naturally releases from the grate when it has formed a proper sear. Trying to force it early tears the crust and leaves protein behind on the bars. Use the tongs to gently test the food. If it moves freely, flip it. If it resists, give it another 60 seconds. Clean grates plus patience equals food that comes off in one piece every time.
A Note on Grate Material and How It Changes Your Approach
Not all grates clean the same way. Stainless steel and porcelain-coated grates are the most forgiving. They can handle soap, soaking, and a firm bristle brush without damage. Stainless can even handle a Scotch-Brite pad if you have baked-on residue that will not budge. Cast iron is the highest maintenance of the three. It seasons beautifully, retains heat extremely well, and produces excellent sear marks, but it requires more care to protect the seasoning and prevent rust. If you have a grill with cast iron grates, follow the no-soap and immediate-oil steps every single time.
Porcelain-coated grates are the most common on mid-range gas grills. They are easy to maintain and relatively rust-resistant, but the porcelain chips if you use aggressive metal tools or scrub pads with sharp edges. The brushes in the Alpha Grillers set are appropriate for all three materials. Just go a little lighter on porcelain and make sure your brush head is not warped or have loose wires before each use.
Now that you have the method, make sure your tools can keep up with it.
The Alpha Grillers BBQ Grill Tool Set gives you the brush, spatula, tongs, and fork to run this whole cleaning and cooking routine without a single weak link. 4.8 stars, nearly 6,000 reviews, and built to last more than one season. It is one of the few sets where nothing in the box disappoints you.
Amazon Check Today's Price on Amazon →