
You pulled the steak off the grill with confidence. You rested it the right amount of time, sliced into it at the table, and stared down at a disc of grey, overcooked meat. Or the opposite: raw red in the center, a cold spot the heat never found. Either way, the people around that table are politely chewing and not saying much. I know that feeling. I grilled steaks for three years by poking them, pressing them, doing the palm-of-your-hand test I saw on YouTube, and I was wrong at least half the time. Then I spent under fifteen dollars on an instant-read meat thermometer and the problem went away permanently.
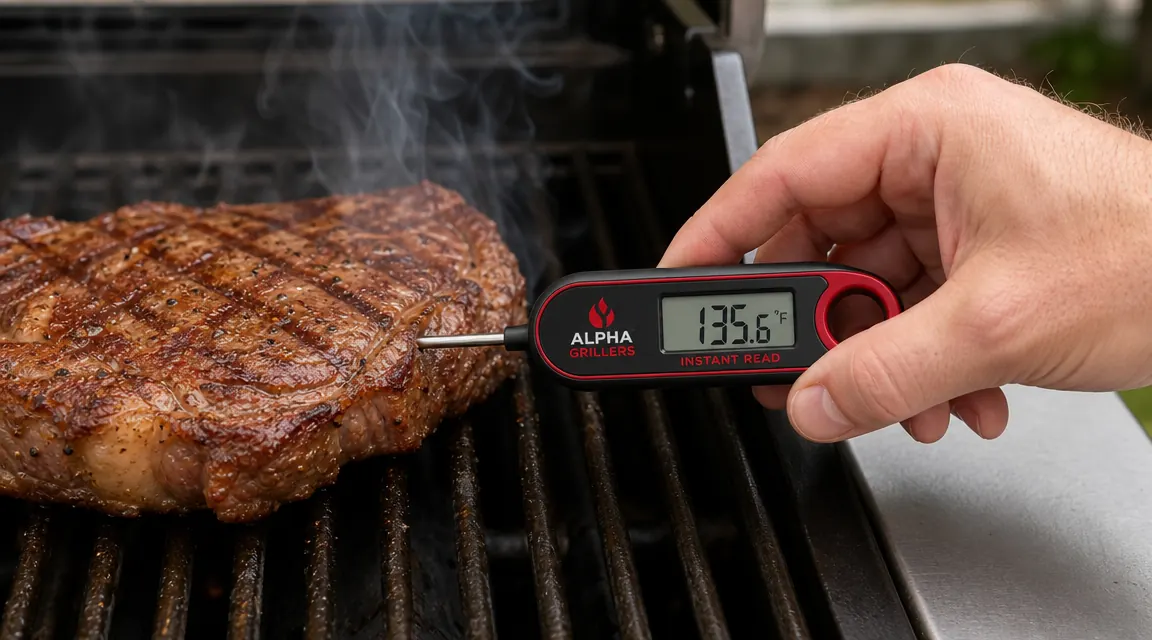
The Alpha Grillers Instant Read Meat Thermometer is the one I reach for every time. It reads in two to three seconds, folds flat when you are done, and costs about the same as a single bad steak. It has over 89,000 reviews on Amazon and a 4.8-star rating, and in my experience that reputation is earned. This guide walks you through exactly how to use it to grill a steak that hits the right temperature every single time, not most of the time.
Stop guessing. The Alpha Grillers thermometer reads in 2-3 seconds and costs less than one ruined steak.
Over 89,000 backyard cooks have made this their go-to thermometer. Check today's price and see why it tops the list for home grillers.
Amazon Check Today's Price on Amazon →Step 1: Start With the Right Steak and Let It Come Up to Room Temperature
Before you light a single coal or turn a single burner, give your steak thirty to forty-five minutes on the counter. Pull it straight from the refrigerator and a one-inch ribeye can take eight to ten minutes longer to cook through to its center than a steak that started at room temperature. That uneven timing is one reason the outside overcooks while the center stays raw. This is not a thermometer trick, it is just physics, and skipping it stacks the odds against you from the start.
Pat the steak dry with a paper towel. Moisture on the surface is the enemy of a good sear because it turns to steam before the meat can brown. Season generously with kosher salt and cracked pepper, or whatever rub you prefer, and let the steak sit uncovered for that thirty-minute window. While you wait, you can get your grill set up.
Steak thickness matters too. A one-inch to one-and-a-quarter-inch steak is the sweet spot for most home grillers. Thinner than that and you are racing the clock to hit medium-rare before the outside burns. Thicker than an inch and a half and you want to use a reverse sear method instead, which we will not cover here but is worth researching separately if you regularly cook thick cuts like a tomahawk or a two-inch ribeye.
Step 2: Set Up Your Grill for Two-Zone Heat
Two-zone heat is the foundation of a steak that is properly seared on the outside and correctly cooked on the inside. One side of the grill runs hot. The other side runs low or indirect. On a gas grill, turn two burners on high and leave one off. On a charcoal grill, bank all your coals to one side. You now have a sear zone and a safe zone, and you need both.
Get the hot side genuinely hot. On a gas grill that means lid down for ten to fifteen minutes before you put any meat on the grate. On charcoal you want the coals ashed over and glowing, not flaming. A properly hot grill gives you the crust that seals in the juices and creates the flavor you are after. A warm grill just slowly steams the steak into greyness.
Step 3: Sear Hard, Then Move to Indirect Heat
Place your steak directly over the hot side of the grill. Do not move it for two to three minutes. You want a crust forming, and that only happens when the steak stays in contact with a hot surface long enough for the Maillard reaction to do its work. When it releases easily without sticking, flip it. Two to three minutes on the other side. You are building the exterior here, not cooking the interior.
Once both sides have that dark, caramelized crust, move the steak to the indirect heat side of the grill and close the lid. This is where the thermometer takes over. You are no longer guessing based on time. You are watching the internal temperature climb toward your target.
For a one-inch steak this indirect phase usually takes four to six minutes. But the thickness of your steak, the grill temperature, and the ambient air temperature all vary, so the only thing that actually tells you when to pull is the thermometer. This is the whole point of this guide.

Step 4: Use the Alpha Grillers Thermometer to Pull the Steak at the Right Temperature
Open the Alpha Grillers thermometer. The probe folds out from the handle, and you insert it into the thickest part of the steak, going in from the side rather than straight down from the top. Inserting from the side gets the probe tip into the true center of the steak. Inserting from the top often overshoots the center or hits a spot closer to the surface than you think.
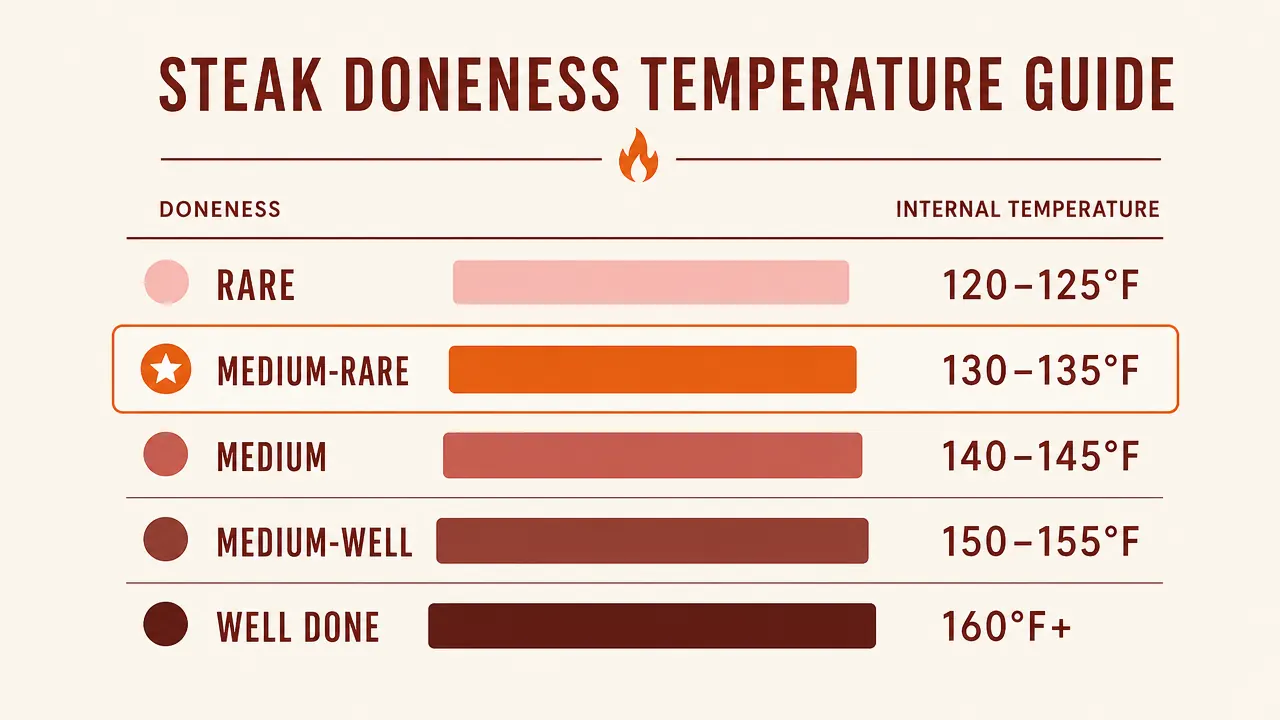
The reading appears in two to three seconds. That speed matters because you do not want to hold the grill lid open for twenty seconds while a slower thermometer catches up. Here are the temperatures you are aiming for, before you factor in carryover cooking:
Rare: pull at 120 to 122 degrees. Medium-rare: pull at 128 to 130 degrees. Medium: pull at 138 to 140 degrees. Medium-well: pull at 148 to 150 degrees. Well-done is a choice I respect but will not help you plan for here. The steak carries over about three to five degrees while it rests, so pulling at 130 gives you a finished temperature of 133 to 135, which is the center of medium-rare.
A thermometer does not take the skill out of grilling. It puts the skill back in, because now you are making exact decisions instead of lucky guesses.
If you are grilling multiple steaks and they vary slightly in thickness, check each one separately. The Alpha Grillers thermometer makes this fast enough that you can check four steaks in under thirty seconds without the grill cooling down noticeably. Do not assume that all steaks cook at the same rate because they sit on the same grill. They do not.
Step 5: Rest the Steak Before You Slice
Pull the steak off the grill and set it on a cutting board or a warm plate. Tent it loosely with a piece of aluminum foil. Let it rest for five to eight minutes for a one-inch steak. During this time the muscle fibers, which have contracted from the heat, relax and reabsorb the juices. Cut into a steak the moment it comes off the grill and those juices run all over the cutting board. Wait five minutes and they stay in the meat.
Resting is also when that carryover cooking completes. The internal temperature will climb those last three to five degrees on its own as the steak sits. If you pulled at 130, you will land at 133 to 135 after the rest. If you pulled at 128, you land at 131 to 133. This is why pulling a few degrees early is always the right move. You can not un-cook a steak that went too far.
After the rest, slice against the grain. You can see the direction the muscle fibers run by looking at the surface of the meat. Cutting perpendicular to those fibers shortens them and makes every bite more tender. Slice with the grain and you are chewing through the full length of those fibers, which takes a lot more work and makes the steak feel tougher than it actually is.
What Else Helps You Grill a Better Steak
The thermometer solves the single biggest variable in grilling a steak, which is knowing when to pull it. But a few other details compound the result. A clean, oiled grill grate prevents the steak from sticking during the sear. A good cast iron or stainless grate holds heat better than a thin chrome-plated one and gives you more consistent sear marks. Season the grate by rubbing a folded paper towel dipped in high-smoke-point oil across the bars just before the steak goes on.
Butter basting in the last minute of the sear is a restaurant technique worth borrowing. Toss a tablespoon of butter and a sprig of rosemary in a small cast iron pan on the hot side of the grill. When the butter is foaming, tilt the pan and spoon it over the top of the steak repeatedly for sixty seconds. It adds a richness to the crust that is hard to get any other way. If that sounds like too much at first, skip it. The thermometer method alone gets you most of the way there.
Salt timing also matters more than most people realize. You can season thirty minutes before cooking, or you can season twenty-four hours ahead and let the steak sit uncovered in the refrigerator overnight. The overnight dry brine draws moisture to the surface, which then gets reabsorbed along with the salt, seasoning the meat more deeply. Both methods work. The thirty-minute approach is fine for a weeknight cook. The overnight brine is worth the extra planning when you are spending money on a good ribeye or strip.
One thing that does not help: cutting into the steak to peek at the color while it is still on the grill. Every cut you make releases juices and disrupts the cook. The thermometer gives you the same information in two seconds without those side effects. Once you have used it a few times you will wonder how you ever cooked without it.
You followed the steps. Now get the tool that makes them work every time.
The Alpha Grillers Instant Read Meat Thermometer reads in 2-3 seconds, folds flat for storage, and has a 4.8-star rating from over 89,000 cooks. It is the simplest upgrade you can make to your grill setup.
Amazon Check Today's Price on Amazon →