You already know how this goes. The chicken thighs go on the grill looking great, you walk back inside for five minutes, and you come back to skin that is black and meat that is still pink near the bone. Or you put a thick ribeye over a full bed of coals and the outside chars before the inside ever reaches medium-rare. You move the coals around, crack the vents, hover over the grill trying to manage it, and still end up with results that are inconsistent at best. Most people blame themselves. The real problem is the setup. You are cooking everything in the same heat zone, which is the same as trying to drive on the highway and in a parking lot at the same speed.
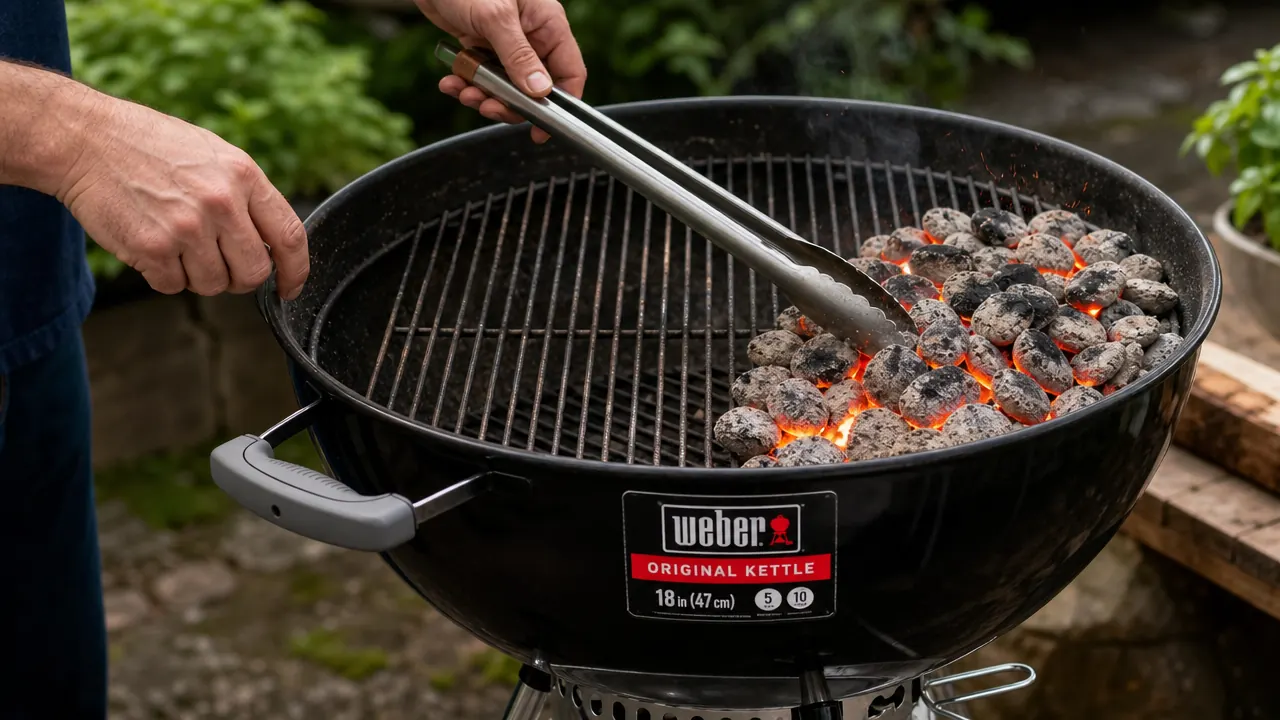
The two-zone fire is the fix, and it is simpler than it sounds. You push all your charcoal to one side of the grill, leave the other side empty, and suddenly you have two cooking environments on one grill: a hot direct zone for searing, and a gentle indirect zone for cooking through without burning. The Weber Original Kettle 22-inch charcoal grill is the best possible tool for learning this technique. Its round bowl, tight-fitting lid, and adjustable vents give you real control over both zones. I have used a lot of kettle-style grills over the years, and the Weber is still the one I reach for when I want results I can repeat.
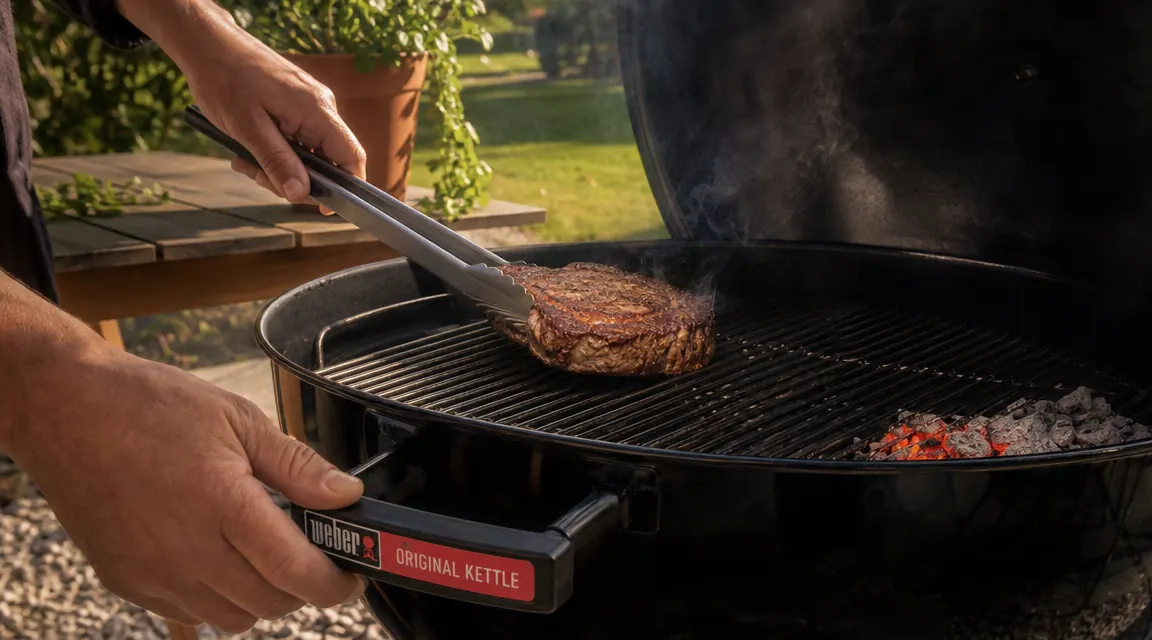
Your charcoal grill setup matters more than your recipe.
The Weber Original Kettle 22-inch is the grill that makes two-zone fire easy, thanks to its removable charcoal grates and tight lid seal. Check the current price on Amazon and see what over 10,000 reviewers already figured out.
Amazon Check Today's Price on Amazon →What You Need Before You Start
Before you even light anything, gather a few things: a full chimney starter (about 80 to 100 briquettes), a bag of quality charcoal, long-handled tongs, a digital instant-read thermometer, and your Weber Kettle with both the cooking grate and the charcoal grate seated properly. If you do not have a chimney starter, get one. Lighter fluid is a shortcut that leaves an off flavor on your food and makes temperature management nearly impossible because you never know exactly how much heat you have. A chimney starter gives you a consistent, predictable amount of lit coals every single time.
One more thing: clean grates matter. Residue from the last cook creates flare-ups and sticking, which will sabotage your sear zone. Give your cooking grate a quick brush with a grill brush before you start. You do not need it spotless, just clear of any big chunks. Cold grate, warm grate, whatever you have is fine at this stage. You will heat it up as part of the setup.
Step 1: Light Your Chimney Starter
Fill your chimney starter to the top. For two-zone fire on a 22-inch kettle, you want a full load of charcoal, which is roughly 90 to 100 briquettes. Fewer coals means your direct zone will not be hot enough to get a proper sear, and your indirect zone will be too cool to hold a consistent temperature. Place a single sheet of crumpled newspaper or a paraffin fire starter cube under the chimney, set the chimney on the bottom grate of your Weber, and light it.
Wait until you see gray ash forming on the top third of the charcoal pile, which usually takes 15 to 20 minutes. That ash is your signal that the coals are fully lit and ready. Do not rush this. Partially lit coals mean wildly uneven heat and a two-zone setup that will not behave the way you want it to. When in doubt, give it another three to four minutes.
Step 2: Pour and Position Your Coals
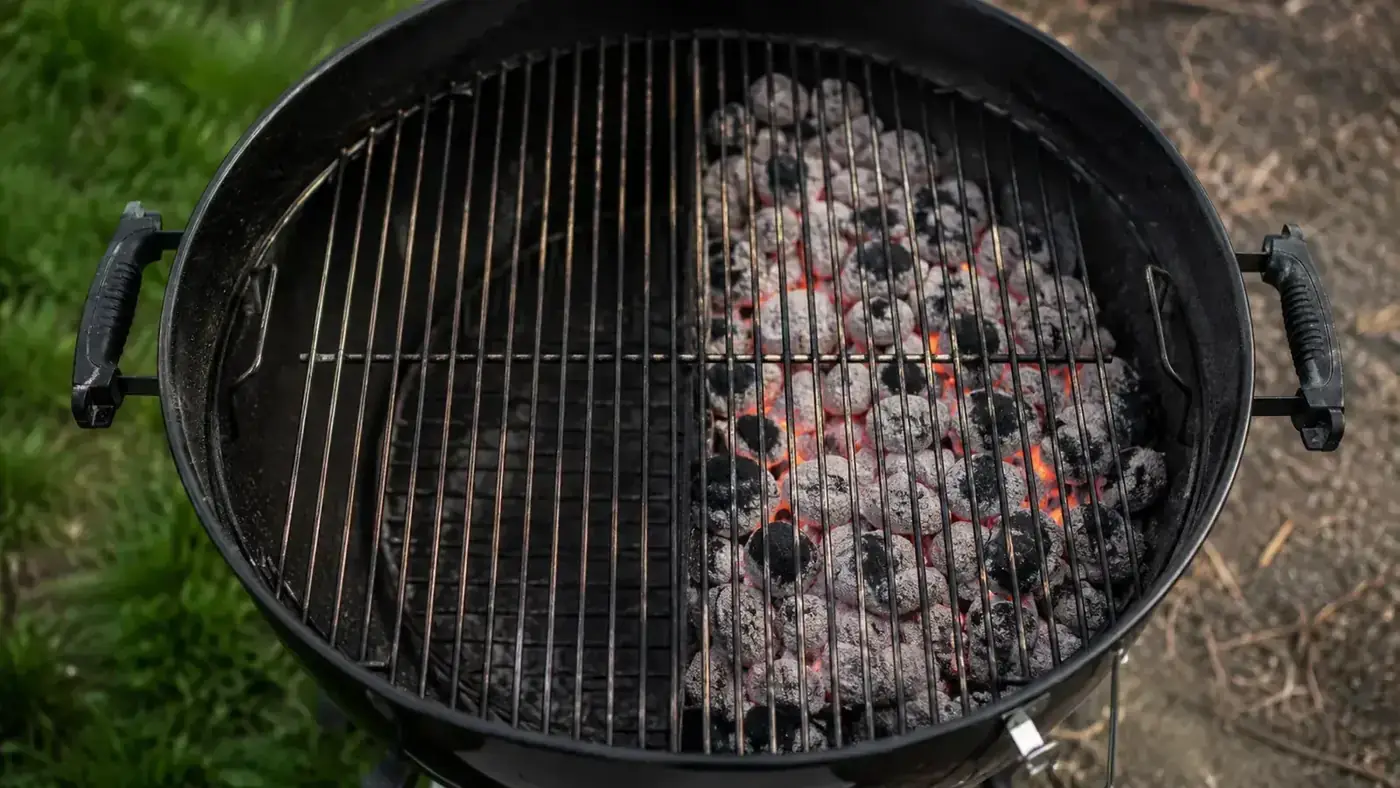
This is the step that actually creates two-zone heat. Open your Weber's lid, set it aside, and pour your lit coals entirely to one half of the charcoal grate. Use your tongs to nudge the pile into a compact mound that covers roughly half the grate surface. The other half should be completely empty. No coals, no scattered ash piles. Clean half. This empty side is your indirect zone, and it is going to do a lot of the heavy lifting in your cooks.
You can build the coal bed one or two layers deep on the direct side. One layer gives you a medium-high sear zone, around 450 degrees Fahrenheit on the cooking grate. Two layers gives you a proper high-heat sear zone that climbs close to 550 degrees. For most cooks, a single solid layer is enough. If you are doing nothing but steaks and burgers at high heat, go with two layers. For chicken, pork chops, or anything that needs time to cook through, one layer is more forgiving.
Step 3: Set Up Vents and Preheat
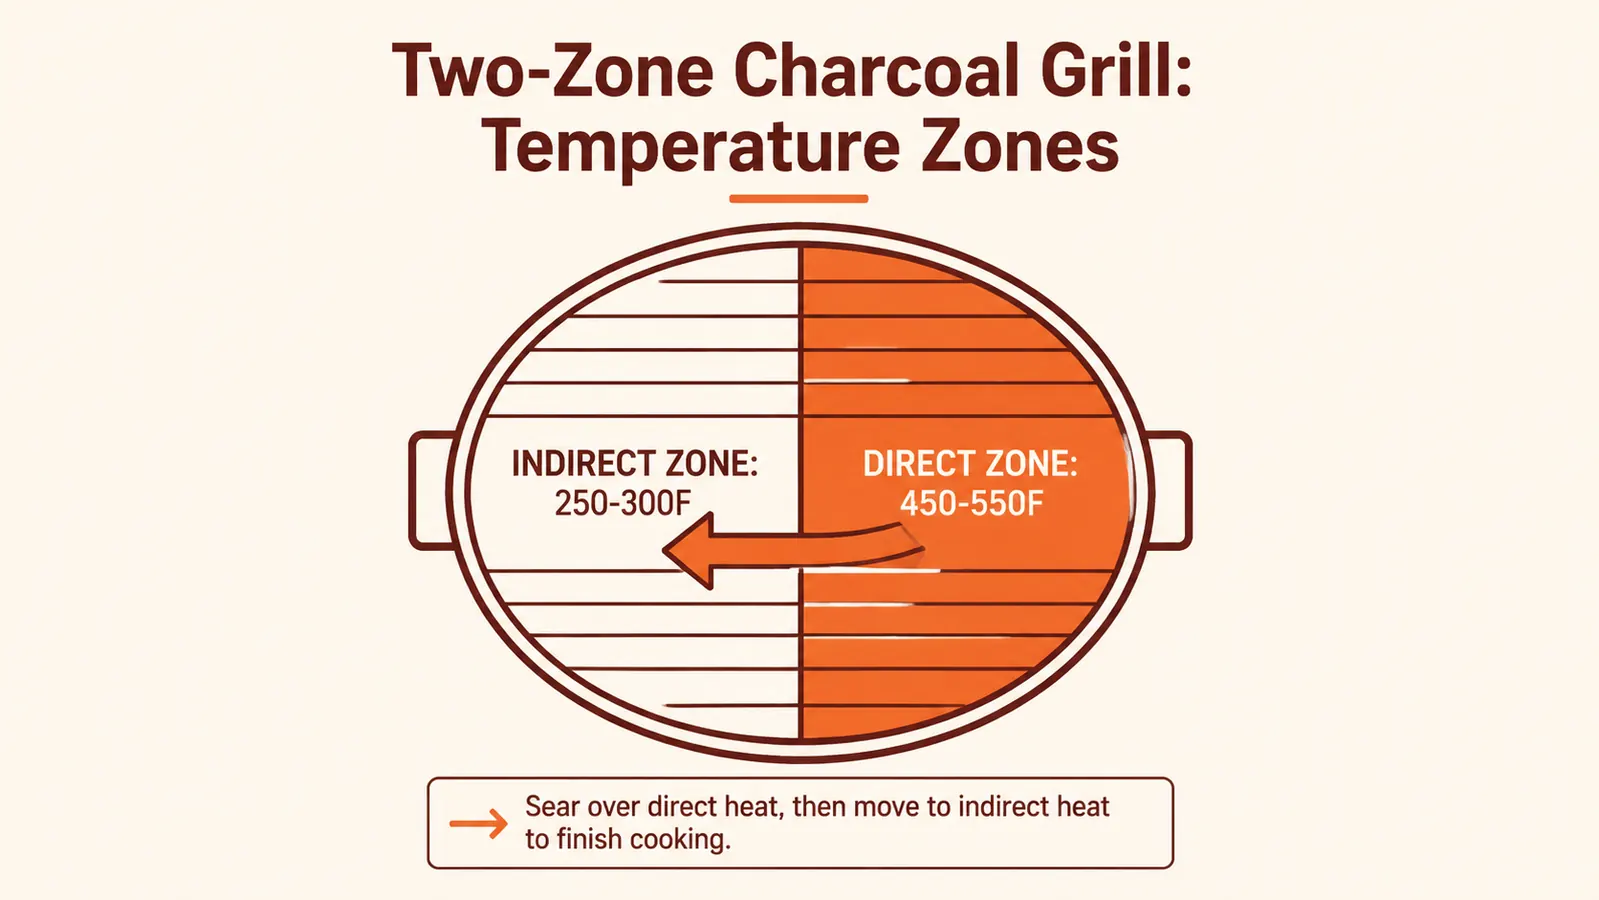
Place your cooking grate over the coals, then put the lid on with the top vent positioned over the indirect (empty coal) side. This matters more than most people realize. The top vent position controls airflow direction: heat and smoke pull toward the open vent, which means they travel across the indirect zone before leaving the grill. This gives your indirect zone more ambient heat and your lid-down cooking much better results. Open both the bottom and top vents fully and let the grill preheat with the lid on for about five minutes.
After five minutes, open the lid and hold your palm about six inches above the cooking grate over the coal side. You should not be able to hold it there for more than two to three seconds. That is your sear zone. Over the empty side, you should be able to hold your hand there comfortably for five or six seconds, which is your indirect zone sitting somewhere between 250 and 325 degrees Fahrenheit. If both sides feel the same, your coals needed more time in the chimney. Add them back, cover, and wait another few minutes.
Step 4: Cook Using Both Zones
Here is where it all comes together. The general rule for two-zone cooking is: start on the indirect side, finish on the direct side. This is called the reverse sear, and it produces better results on almost anything thicker than an inch. For a thick-cut bone-in chicken thigh, place it skin-side up on the indirect side, lid on, and let it cook for 20 to 25 minutes until the internal temperature hits 155 degrees Fahrenheit. Then move it to the direct zone for three to four minutes per side to crisp the skin and get the char marks. The inside is already cooked through, so you cannot overcook it. You are just adding texture at the end.
For a thick ribeye, use the same principle. Start on the indirect side with the lid on until the internal temperature reads 115 to 120 degrees Fahrenheit for medium-rare, which usually takes 12 to 18 minutes depending on thickness. Then sear directly over the coals for 90 seconds per side with the lid off. The result is a steak that is evenly pink from edge to edge with a proper crust, not gray in the middle with burnt edges. Once you cook this way, it is genuinely hard to go back to the old method.
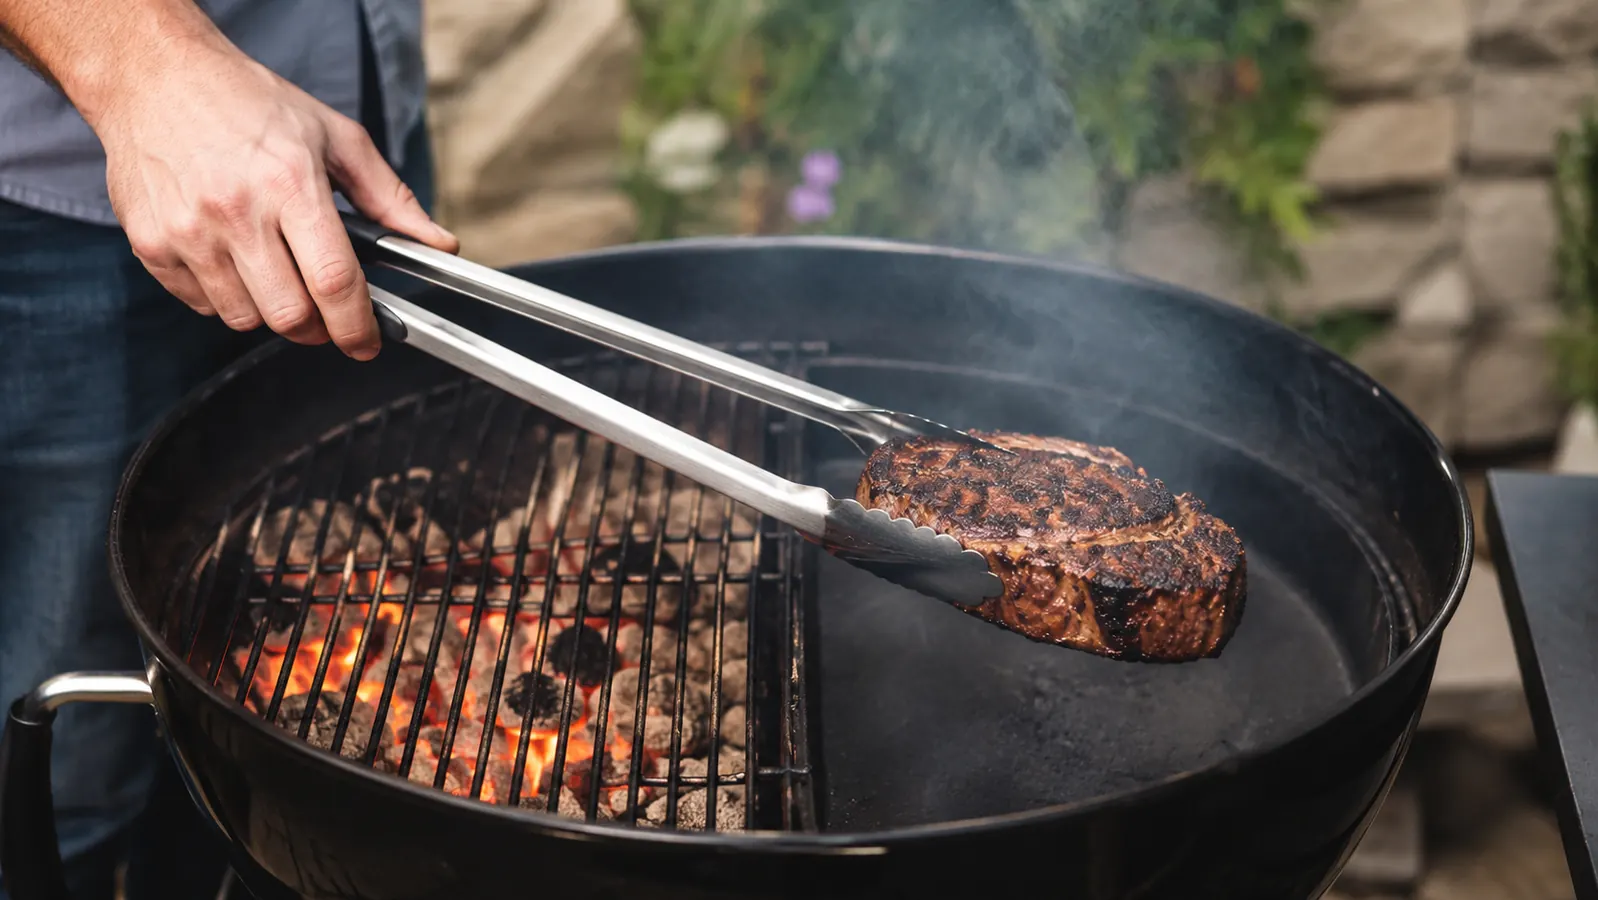
Start indirect, finish direct. That one rule changes every cook. Your food gets done without burning, and you stop feeling like the grill is in charge of you.
Step 5: Manage Temperature and Add Coals if Needed
A full chimney of briquettes will hold solid cooking heat for about 45 to 60 minutes on a Weber 22-inch kettle. For most weeknight cooks, that is plenty. If you are doing something longer, like spatchcocked chicken or pork tenderloin that needs more time, you may need to add 20 to 25 unlit briquettes to the coal pile about 30 to 40 minutes in. Do not wait until the coals are completely gray and spent. Add fresh coals while the existing ones still have orange life in them so the new ones catch without a gap in temperature.
To cool the grill down during the cook, close your bottom vent partially. Half-open will drop the temperature by 50 to 75 degrees over the next ten minutes. To push heat back up, open both vents fully and give it a few minutes. The Weber Kettle's vent system is surprisingly responsive once you have used it a few times. Most beginners leave the vents fully open the whole time and wonder why the grill gets out of control. Vent management and two-zone cooking are the two skills that take you from frustrated to confident.
What Else Helps
A good instant-read thermometer removes all the guesswork from two-zone cooking. Instead of cutting into meat to check doneness, you check the internal temperature before you move anything from the indirect zone to the sear zone. This is the single biggest upgrade you can make to your charcoal cooking workflow beyond the two-zone setup itself. Aim for 115 to 120 degrees on steaks before the sear, 150 to 155 on chicken thighs before the crisping step, and 140 on pork chops before the final char.
A charcoal chimney starter, as I mentioned earlier, is not optional. It is the tool that makes every cook start right. A half-lit pile of coals is the fastest way to undo everything the two-zone method gives you. Beyond that, long-handled tongs (at least 16 inches) let you safely move food between zones without getting your hand close to the direct side. And a grill-safe aluminum drip pan placed on the indirect side under proteins like chicken or pork keeps the inside of your kettle cleaner and prevents flare-ups from dripping fat.
Common Mistakes to Avoid
The most common mistake is spreading the coals too thin across the whole grate instead of keeping them compact on one side. A spread-out fire means neither zone is doing its job. Your sear zone is not hot enough for a real crust, and your indirect zone is warm enough to continue cooking but not in a controlled way. Keep your coals tightly banked. The pile should look almost like a stack, not a single flat layer spread across half the grate.
The second most common mistake is cooking with the lid off the whole time. The lid is what turns your grill into an oven on the indirect side. Without the lid, the indirect zone is just a corner of the grill that is slightly less hot. With the lid on, it holds consistent ambient heat that cooks food through evenly. Put the lid on during the indirect phase. Take it off when you sear. It is that simple.
Finally, do not skip the preheat. Five minutes with the lid on after you set your coals lets the cooking grate reach temperature, which is what gives you the grill marks and the crust. A cold grate means food sticks, and food that sticks is food that tears when you try to move it between zones. Five minutes is not long. Use them.
Ready to try this on a grill that actually cooperates with you?
The Weber Original Kettle 22-inch is built for exactly this technique. Over 10,000 reviewers and 4.8 stars. Check today's price on Amazon and use it for your first two-zone cook this weekend.
Amazon Check Today's Price on Amazon →